Showing posts with label cooking. Show all posts

Wednesday, May 16, 2012

Lengthy Tempeh Ramblings

Sometimes, I make tempeh.
Fresh Chickpea Tempeh
 Now, for those who don't know what tempeh is, it's an Indonesian protein source made of moldy beans!
...which I know doesn't sound all that appealing, but it is delicious. The beans are lightly cooked, then inoculated with mold spores and incubated for 24 hours. The mold grows and holds the beans in a tightly-woven mycelium mat that smells lightly of mushrooms.
Store-bought tempeh, in my experience, is expensive and tends to have a bitter aftertaste. Homemade tempeh has a mild mushroomy flavor... and let's face it: you can't get much cheaper than dried beans!
I got my tempeh inoculant from GEM cultures (the soy section). They send instructions on how to make tempeh with the culture, but the internet is also full of different methods. A good tempeh making resource is actually available free online from google books The Book Of Tempeh, chapter 6 is where you should go for tempeh making instructions.
I decided I wanted to make tempeh months ago, so I made myself an incubator out of an old cooler, with an old lamp I disassembled and a water heater thermostat (like these egg incubators, but less fancy because tempeh is less finicky than chicken embryos)
The outside of the incubator
The inside lid of the incubator


I have made about 3 batches of soy tempeh and one of chickpea, and I think I like the chickpea tempeh better. The soy tempeh is kind of chewy and tends to crumble more, while the chickpea tempeh has a soft smooth texture and a lighter flavor... but that could just be this one batch. It might turn out differently next time... ah, the joys of unpredictable cultured foods!
So... I have noticed that most tempeh recipes online are designed for bitter-tasting store bought tempeh, and so call for simmering the tempeh in water first, then draining the water and continuing with the recipe, but since homemade tempeh doesn't taste bitter (that I have made so far), and since boiling the tempeh makes it more crumbly, I would just as soon leave that whole step out.
Here are my two favorite ways of cooking tempeh

Tempeh steamed over vegetables
Dice up some vegetables, what vegetables you use are up to you, but I would recommend always starting with onions and garlic. Add a dash of olive oil to a pan over medium-low heat, add the vegetables, and lay the tempeh over top. Add a few tablespoons of water, and put a tight lid on the pan. Let steam until most of the liquid is gone and the veggies are beginning to caramelize, then, using a spatula, flip the tempeh and vegetables so the caramelized veggies are on top and the tempeh is on the bottom. add a few tablespoons of soy sauce and cover again until the tempeh is browned on the bottom.
Serve over rice, with soy sauce to the side.
Soy tempeh with veggies
Chickpea tempeh with veggies


Chickpea Tempeh with veggies over orzo with a side of seaweed
Tempeh with BBQ sauce
Put your tempeh pieces in a pan and cover with your favorite BBQ sauce (my homemade sauce contains tomato, garlic, ginger, soy sauce, and molasses... all pretty much to taste)
Let the pieces marinate for a little while if possible. (while your rice cooks)
When the rice is mostly done, turn the tempeh pan on to medium low and let the tempeh simmer (if your sauce is really thick, you might want to add a little water), occasionally flip the tempeh pieces over so they cook evenly. Once the tempeh has simmered a few minutes on each side and seems to be cooked through, remove the tempeh from the BBQ sauce and put the sauce in a serving dish, rinse out the pan and add a little olive oil to it. sear the tempeh on both sides, then serve over rice (or in a hamburger bun) with bbq sauce over it. 
Searing the tempeh
BBQ tempeh over rice with a side of salad


I realize that this is a pretty long and rambling post. I am sorry for that... but I hope it inspires at least one person to try tempeh... it's really fun!
Love,
-Zay

Wednesday, April 20, 2011

Pesto & Pesto Ricotta

Pesto is something that everyone should make and eat. I was not exposed to it until I went to College, and then I was unimpressed by underseasoned salads utilizing old pesto... and then I went and worked for Bianca for a summer, and made more fresh delicious pesto than you can shake a stick at. It's been love ever since.
All you need to make yourself a pretty good supply of pesto is a single plant. Trim it back a few times, encourage it to grow into a bush, and you have all the pesto two people can eat all summer, with a little left over to freeze for winter... though the frozen is never quite as good as fresh.

Pesto
2 cups basil leaves, well packed, stems removed
2/3 cup extra virgin olive oil (approximately)
2 Tbsp fresh grated parmesan
2 Tbsp pine nuts
2 tsp garlic
1/8 tsp each salt and black pepper

In it's simplest incarnation, simply process everything together in a food processor until smooth, scraping down the sides once or twice if necessary. I, however, prefer a slightly 'chunky' pesto, so I leave out a Tbsp each of the parmesan and pine nuts, chop them with a knife, and stir them in later. If you prefer a thin, oily pesto (good for dipping bread in), just add more olive oil. Adding more olive oil is usually necessary if you are trying to use a blender instead of a food processor.
I have actually made pesto without having access to a blender or food processor of any kind. It involved a lot of very very fine dicing with a sharp chef's knife. It turned out decent, but was better for dipping bread than for seasoning pasta... but it can be done!

To use Pesto, you can toss it with warm pasta, spread it on a pizza instead of tomato sauce, toss it with fresh boiled baby potatoes, spread it on crackers, put it on sandwiches (pesto-chicken-mozzarella anyone?), and my favorite: make pesto ricotta.
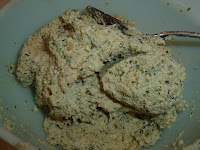
Pesto and Ricotta, about to become One
Pesto Ricotta
some pesto
about twice to three times as much ricotta

mix together well.
Pesto Ricotta
Pesto Ricotta on a Lasagna


I decided to make pesto ricotta the first time a few summers back when I suddenly realized I didn't have enough pesto to go with the pasta dinner I was making. It turned out better than I could have hoped, and has become a staple when I am making pasta dishes. I like it best when you can get a mouthful of warm tomato sauce and noodles with a little cold, creamy pesto ricotta in with it. The contrast is key.
I also like pesto ricotta on pizza. I usually dot a pizza with generous tablespoonfuls, then top and bake as I normally would.

Anyway, with summer approaching I think this is a timely reminder.
Plant your Basil! Make your Pesto! Eat Delicious Food!
-Zay

Wednesday, March 30, 2011

Ceviche de Camaron

I found a blog, and I have to share it. Laylita's Recipes is a great collection of Ecuadorian recipes. I found her while idly looking for a recipe for Empanadas de Verde, which I remembered from my childhood in Ecuador, and was blown away by her website. The recipes are clear and interesting, and the pictures will make you drool. Blogs like hers remind me why I will never be a pro food blogger, she's just so good.
The only thing I've made from her website so far is Ceviche de Camaron, or Shrimp Ceviche.
It turned out fantastic. Of course I didn't completely follow any one recipe, but I combined a few of her Ceviche recipes and it turned out great. Pictured is the Ceviche surrounded by chifles. It was a good dinner.
In conclusion, I would highly recommend Laylita's Recipes if you want to cook some good Ecuadorian food.
-Zay

Sunday, March 20, 2011

Sunday Crepes

For nearly a year now, Tyler and I have had the tradition of making crepes for our Sunday brunch. Crepes are not too hard to make, but just take time and patience, the perfect way to start a lazy Sunday.
And right now, everyone related to me is shouting "Danish Hotcakes! Not Crepes! Resist the Dark Side!" and I don't care because I would rather use a word that is understood by more people. I call them crepes, and you-all are too far away to smack me upside the head.

Crepes
1 cup flour (all whole wheat, or half and half, or even half buckwheat)
a pinch salt
1 Tbsp oil
1 Tbsp honey, optional
1 cup milk
2 eggs

In a bowl, mix the flour and salt. Whisk in the milk until there are no lumps, then whisk in the rest of the wet ingredients. Let the batter rest for a few minutes.
Heat a large nonstick pan on the stove on medium, and very lightly oil. Pour about 1/4 cup of crepe batter in the middle of the pan, and swirl slightly to spread it, then smooth the batter out over the hot pan with the back of a spatula using a spiraling motion from the middle to the outside. - this step takes practice, you will mangle a few before you get the hang of it. It's ok.
When the crepe is set, flip it over and cook a on the other side for a few seconds, then remove to a plate and continue with the next crepe.
If you are an expert, you can handle many pans at once, but I find for a small group there are better uses for the spare burners, like...

Fillings:

Apple Pie Filling
2 large Apples, cored and chopped
1 tsp cinnamon
1 Tbsp cornstarch mixed with 1/3 cup water
some honey

Put your cored chopped apples in a small pot with a good lid, sprinkle with cinnamon and a little honey, cover, and heat on the back burner on low, opening and stirring occasionally. When the apples seem softened to your liking, add the cornstarch water, mix well, and cover, letting the cornstarch cook through. Taste and adjust the cinnamon and honey to your liking.
If the apples are very sweet, you might want to add a squeeze of lemon juice to the filling for extra deliciousness.
Crepes filled with apple pie filling are especially good with whipped cream on top.

Lemon Filling
1/4 cup corn starch
1/4 cup lemon juice
2 eggs
1 cup water
1/3 cup honey
1 tsp lemon zest, optional
1/4 tsp salt
2 Tbsp butter
1 tsp vanilla
In a blender, mix all the ingredients except the butter and vanilla. Transfer the mixture to a small pot and cook on low, stirring often to prevent sticking. When the filling has boiled through and is very thick, remove from the heat and stir in the butter and vanilla. Adjust the lemon and honey until the filling is to your liking.

To eat Crepes, lay a crepe on your plate, spread a line of filling down the middle. With one tine of your fork, puncture the edge of the crepe, roll the crepe over the filling around your fork, then gently pull your fork free. If you attempt to roll your crepe with your fingers at my table you will get disapproving looks and/or ridicule. If you do so at my mother's table, you will get your hands smacked.
Enjoy!

Sunday, February 28, 2010

Honey Peanut Butter Cookies of Deliciosity - 3 ways

I love peanut butter cookies, and lately I have been having a craving for them.
Unfortunately, most recipes for honey cookies have a token teaspoon of honey and a cup of sugar - not good for those who refuse to eat the refined stuff - and sugar-free recipes all use chemical sweeteners which freak me out to no end.
So I made my own! This recipe has three versions - it's a forgiving medium, so have fun and play around with it!

Honey Peanut Butter Cookies - the recipe closest to the original
1/2 cup butter
1/2 cup all natural peanut butter
1 egg, beaten
1/3 cup honey (or maple syrup, or agave, or whatever)
1 tsp vanilla
1 2/3 cup flour
1/2 tsp baking powder

Honey Peanut Butter Cookies - Option 2, Supersize the PB! (my favorite)
1/4 cup butter
3/4 cup all natural peanut butter
1 egg, beaten
1/3 cup honey (or maple syrup, or agave, or whatever)
1 tsp vanilla
1 2/3 cup flour
1/2 tsp baking powder

Honey Peanut Butter Cookies - Option 3, Sweeter!
1/4 cup butter
1/2 cup all natural peanut butter
1 egg, beaten
1/2 cup honey (or maple syrup, or agave, or whatever)
1 tsp vanilla
1 2/3 cup flour
1/2 tsp baking powder

Mix wet ingredients in a bowl, add the dry ingredients and mix until homogeneous but do not over-mix. Form into balls and place on a greased cookie sheet. Press with a fork to make the charictaristic hatchmark on top and to flatten the balls. Bake at 350* 8-10 minutes until the bottoms are lightly browned. Remove to a rack to cool. These cookies are very tender, not overly sweet, and good with milk.

RECIPE NOTES:
If you use unsalted Peanut Butter, add 1/2 tsp salt to your dry ingredients.
If you want whole wheat cookies, this recipe is great for that. I use 1 cup whole wheat flour and 2/3 cup white flour.
If you don't want to use/don't have baking powder, use baking soda and add 1 Tbsp vinegar to the wet ingredients.

Friday, November 9, 2007

Dark Chocolate Mousse

Not bear poop
not bear poop


No longer will this chocolate addict be denied Chocolate Mousse with Raspberry sauce, for I have created one with no refined sugar!
Muahahahaha! The world will now be mine!

Dark Chocolate Mousse

-mousse
1 medium egg yolk
1 T butter
2 medium egg whites
1-3 T real maple syrup or honey
1/2 cup heavy cream
6 oz Dark, Semisweet, or Unsweetened Baker's chocolate.

-sauce
1/4 cup real maple syrup
2/3 cup fresh or frozen raspberries
lemon juice
extra raspberries to garnish (optional)

Melt the chocolate and butter in a double boiler. beat in the egg yolk and 3 T of the cream.
In a large bowl, beat the remainder of the cream until it holds it's own shape. Fold carefully into the chocolate.

In a separate very clean bowl with a very clean whisk, beat the egg whites until they form soft peaks. Gradually whisk in 1 T of the maple and continue whisking until stiff but not dry. Gently fork the egg whites a little at a time into the chocolate until well combined. Taste the mousse, depending on the darkness of the chocolate used, add 1-2 more T of maple, folding in gently, if needed. Cover and refrigerate.

-sauce
Combine maple and raspberries in a small pot. heat until almost boiling and simmer stirring occasionally for 3 minutes. Puree in a blender then rub through a sieve to remove most of the seeds. Add lemon to taste. To serve, spoon a small amount of mousse into a small serving bowl. pour a little raspberry sauce over top. garnish with a few fresh raspberries and eat with a spoon.
Related Posts Plugin for WordPress, Blogger...